Saturday, November 12, 2011

SEO for SharePoint 2010

You've done your SEO research, found all the keywords for the Titles and came up with perfect descriptions..... now where does it all go in your SharePoint site?

By default there is no meta description tag in master pages, search engines will pick up text from your page, and the title that you see in the browser tab is the title of your page or site.

The solution is pretty straight forward: Create custom columns for SEO Title and Description tags and add them to their own content type based on the Article page layout (I am working with publishing site). Of course you can add your custom columns to Article page, but on the other hand, not all of the pages will need to have SEO Titles and Descriptions. 

All of the work will be done in SharePoint Designer, so check your permissions on the site you will need to have access to Site Columns, Content Types and Page Layouts.
Creating New Site Columns for SEO Title and Description (meta description tag)

SEO Title:

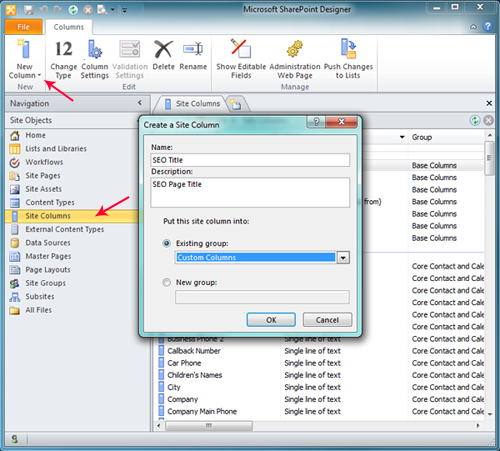
Open the site in SP Designer, in Site Object select Site Columns and create New Column> Single Line of Text give it a Name (SEO Title) add description if you want, and select Existing group: Custom columns, OK.

SEO Description:
In Site Columns again create New Column > this time select Multiple Lines of Text* give it a Name (SEO Description) add description if you want, select Existing group: Custom columns, OK.

*Google search will display 160 characters for the description, default length of the Muli line text field is 255 characters.  
Save Site Columns (Top left corner Save Icon)

SEO Title and SEO Description are now under Custom Columns:

Creating Custom Content Type:

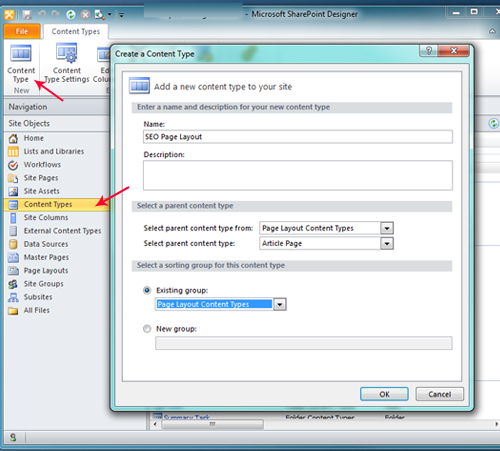
In Site Objects select Content Types, from the ribbon Content Type (New):
Name - SEO Page Layout
Select parent content type from:  Page Layout Content Types
Select parent content type: Article Page
Existing group: Page Layout Content Types
OK


In Content Types (1) scroll down to Page layout content types, click on the newly created SEO Page Layout content type(2) and click on Edit Columns (3)

From the ribbon click on Add Existing columns, Scroll Down to Custom Columns add SEO Title column, click OK. repeat for SEO Description Column.


Save Content Type by clicking on Save Icon (top left corner)

Adding SEO Title and SEO (meta) Description Fields to the page layout

In Site Objects click on Page Layouts, from the ribbon Click on New Page Layout
in Content Type Name dropdown select SEO Page Layout, give it a Name and Title

The default new page layout will be created with two content placeholders: PlaceHolderPageTitle and PlaceHolderMain

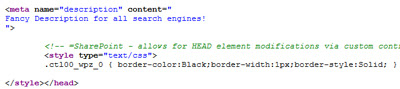
We need to add an extra content placeholder to hold our Meta Description tag - SEO Description - PlaceHolderAdditionalPageHead, asp literal tags will hold the tag itself with metaStart to start the meta tag containing meta name and content and metaEnd closing tag - place the code above PlaceHolderPageTitle:
(PlaceHolderAdditionalPageHead is a required placeholder for the masterpages it is sitting inside the <head></head> tag in v4.master and nightandday.master)

<asp:Content ContentPlaceholderID="PlaceHolderAdditionalPageHead" runat="server">
<asp:literal ID="metaStart" runat="server" Text="&lt;meta name=&quot;description&quot; content=&quot;"/>
<SharePointWebControls:FieldValue id="MetaDescription" FieldName="SEO Description" runat="server"/>
<asp:literal id="metaEnd" runat="server" Text="&quot;&gt;"/>
</asp:Content>

Modify existing PlaceHolderPageTitle by adding SEO Title field value right after the PageTitle:

<asp:Content ContentPlaceholderID="PlaceHolderPageTitle" runat="server">
 <SharePointWebControls:FieldValue id="PageTitle" FieldName="Title" runat="server"/>
 <SharePointWebControls:FieldValue ID="SEOTitle" runat="server" FieldName="SEO Title"/>
 
</asp:Content>


Save the page layout check in, publish and approve. Make sure this page layout is available on the site by checking Site Actions>Site Settings> Page Layouts and Site Templates.

Now the easy part: Navigate to the page that needs to have SEO Title and Description added.
Check out the page, Edit page, from the Ribbon click on Page Layout and select SEO Default Page Layout under our custom SEO Page Layout type

From the ribbon click on  Edit Page Properties, scroll down to SEO Title and Description and add your text
Save, check in the page, publish and approve, the browser tab is now displaying SEO Title text next to the page title.

View source of the page and search for your Description text


done.

Saturday, October 29, 2011

DVWP (Data View Web Part) as a rotating banner : SharePoint 2010 & Jquery

Description: Data View Webpart modified to display images from the local image library, images are linked, url opens in the new window or parent window, Start Date and End Date are used to expire/activate banners, images are sorted by number specified in a custom column (Position).
Specs
: Public facing Publishing site on SharePoint 2010 Foundation, custom master page - I am using Heather Solomon's Publishing master, (simple) custom page layout with a webpart zone - check Randy Drisgill's branding post, custom css.


First thing to mention this set up will only work on the site where the image library list is located, very useful for home page banner.
There is no clip region in the banner rotator so make sure that your banner images are all the same size. 
Custom Image library does not have an approval workflow activated, you can add Versioning Settings in the library settings and then add additional filter in the Data View Webpart to display only Approved Items.


You will need SharePoint Designer and Nivo slider with default template (this is the first one that popped up in my search) download Free jquery plugin. 


  1. Create HomePageBannerImages image library with three custom columns:
    From Site Actions > More Options > Picture Library  > Create - Name it (HomePageBannerImages)
    From Settings in the image library select Create Column to create the following columns:
    LinkURL - Hyperlink or Picture, Require that this column contains information, Format Url as Hyperlink, Add to default view
    Position - Number, Require that this column contains information, Add to default view
    TargetWindow - Choice, Require that this column contains information, Type each choice ... :_parent _blankAdd to default view - you can always set choices as New Window, Same Window- easier for the end users- and then use conditional statements in xsl to render correct target for the url.
  2. Unzip Nivo Slider package and upload files to the folders, I've created CustomCss and js folders in Style Library/en-us/:
    js: jquery.nivo.slider.pack.js
    CustomCss: default.css (themes/default folder in nivo package) and nivo-slider.css
    Images folder: bullets.png, arrows.png and loading.gif (themes/default folder in nivo package)
    modify default.css file to point images to correct folder i.e: background:#fff url(/images/loading.gif) no-repeat 50% 50%;
  3. In Sharepoint Designer create new page layout copy/paste code below. What I have is very Simple Page Layout for the home Page:  Banner area (webpart zone), Content Editor and table with 3 webpart zones for various feeds.
    *Make sure you add link to jquery library in your master page
    <script type="text/javascript" src="http://ajax.googleapis.com/ajax/libs/jquery/1.6.4/jquery.min.js"></script>
     I am adding links to js slider and css files in the page layout simply because this will be the only page that will hold the banner
    <%@ Page language="C#"   Inherits="Microsoft.SharePoint.Publishing.PublishingLayoutPage,Microsoft.SharePoint.Publishing,Version=14.0.0.0,Culture=neutral,PublicKeyToken=71e9bce111e9429c" meta:progid="SharePoint.WebPartPage.Document" meta:webpartpageexpansion="full" %>
    <%@ Register Tagprefix="SharePointWebControls" Namespace="Microsoft.SharePoint.WebControls" Assembly="Microsoft.SharePoint, Version=14.0.0.0, Culture=neutral, PublicKeyToken=71e9bce111e9429c" %> <%@ Register Tagprefix="WebPartPages" Namespace="Microsoft.SharePoint.WebPartPages" Assembly="Microsoft.SharePoint, Version=14.0.0.0, Culture=neutral, PublicKeyToken=71e9bce111e9429c" %> <%@ Register Tagprefix="PublishingWebControls" Namespace="Microsoft.SharePoint.Publishing.WebControls" Assembly="Microsoft.SharePoint.Publishing, Version=14.0.0.0, Culture=neutral, PublicKeyToken=71e9bce111e9429c" %> <%@ Register Tagprefix="PublishingNavigation" Namespace="Microsoft.SharePoint.Publishing.Navigation" Assembly="Microsoft.SharePoint.Publishing, Version=14.0.0.0, Culture=neutral, PublicKeyToken=71e9bce111e9429c" %>
    <asp:Content ContentPlaceholderID="PlaceHolderAdditionalPageHead" runat="server">
    <script type="text/javascript" src="/Style Library/en-us/js/jquery.nivo.slider.pack.js"></script>
    <link rel="stylesheet" href="/Style Library/en-us/CustomCss/default.css" type="text/css" media="screen" />
    <link rel="stylesheet" href="/Style Library/en-us/CustomCss/nivo-slider.css" type="text/css" media="screen" />
    <style type="text/css">
    #slider a{
    display:block;
    }
    </style>
    <script type="text/javascript">
     $(window).load(function() {
            $('#slider').nivoSlider({
            effect: 'slideInLeft',
            animSpeed: 500,
            pauseTime: 5000,
            pauseOnHover: true
            });
        });
        </script>
    
    </asp:Content>
    
    <asp:Content ContentPlaceholderID="PlaceHolderPageTitle" runat="server">
     <SharePointWebControls:FieldValue id="PageTitle" FieldName="Title" runat="server"/>
    </asp:Content>
    
    <asp:Content ContentPlaceholderID="PlaceHolderMain" runat="server">
    <WebPartPages:SPProxyWebPartManager runat="server" id="spproxywebpartmanager"></WebPartPages:SPProxyWebPartManager>
    <div id="banner">
    <WebPartPages:WebPartZone id="g_C7F9DDBE501142A69EE4B39CF62A1A12" runat="server" title="Banner"><ZoneTemplate></ZoneTemplate></WebPartPages:WebPartZone>
    </div>
    <div id="Article">
    <PublishingWebControls:RichHtmlField FieldName="f55c4d88-1f2e-4ad9-aaa8-819af4ee7ee8" runat="server" AllowFontColorsMenu="False" AllowFontStandardColors="False" AllowFontThemeColors="False" AllowStandardFonts="False" AllowThemeFonts="False" MinimumEditHeight="400px"></PublishingWebControls:RichHtmlField>
    <table width="100%"> <tr><td valign="top" style="width:270px;">
    <WebPartPages:WebPartZone Title="left" runat="server" ID="left" CssClass="Blog"><ZoneTemplate></ZoneTemplate></WebPartPages:WebPartZone></td>
    <td valign="top" style="width:270px;">
    <WebPartPages:WebPartZone Title="center" runat="server" ID="center" CssClass="Events"><ZoneTemplate></ZoneTemplate></WebPartPages:WebPartZone></td>
    <td valign="top" style="width:270px;">
    <WebPartPages:WebPartZone Title="right" runat="server" ID="right" CssClass="Press"><ZoneTemplate></ZoneTemplate></WebPartPages:WebPartZone>
    </td></tr></table>
    </div>
    </asp:Content>
    

    Save page Layout, check in, publish and approve. Check the site settings and make sure the page layout is available in Page Layouts. Go to the page where you need your banner: Edit page and Apply newly created layout. Save the page.
  4. Open Site in Sharepoint Designer, Expand "All Files", expand "Pages" folder, I am modifying default.aspx file. Right click on the file and select "Detach From Page Layout", right click again and this time "Edit File in Advanced Mode"
  5. Click on "Split" to show Split view of the Design and Code (bottom of the editing area)
    in the design view locate Banner div and click inside the Banner div area.
  6. From the Ribbon > Insert Tab> In the Data Views & Forms Area > Select Data View > Empty Data View
  7. Select HomePageBannerImages from Document Libraries by clicking on "Select a data source"
  8. In the Data Source Details area select first item in the Rows, usually it is Name field and from the dropdown "Insert Selected Fields as" select "Multiple Items View".

    Now the fun stuff:
  9. From the Ribbon > Paging > All Items
  10. From the Ribbon > Sort & Group: add Position and Select Ascending
  11. From the Ribbon > Filter set filters as shown below (Less Than or Equal  AND  Greater Than or Equal to)
  12. In the WebPart Zone Tools Set Chrome Type to None
  13. In the WebPart Zone click on Properties and in the Data View Properties click on the XSL editor
  14. Replace all the fancy SP stuff with the following xsl:
    <xsl:stylesheet xmlns:xsl="http://www.w3.org/1999/XSL/Transform" version="1.0"
        xmlns:ddwrt2="urn:frontpage:internal"
        xmlns:ddwrt="http://schemas.microsoft.com/WebParts/v2/DataView/runtime"
        exclude-result-prefixes="ddwrt2 ddwrt">
        <xsl:output method="html" indent="no"/>
        <xsl:param name="Today">CurrentDate</xsl:param>
        <xsl:template match="/">
            <div class="slider-wrapper theme-default">
                <div class="ribbon"></div>
                <div id="slider" class="nivoSlider">
                    <xsl:apply-templates select="*"/>
                </div>
                <div id="slideshow_btns"></div>
            </div>
        </xsl:template>
        <xsl:template match="Row">
            <a href="{@LinkURL}" target="{@TargetWindow}"><img border="0" src="{@FileRef}" alt="{@FileRef}"/></a>
        </xsl:template>
    </xsl:stylesheet>
    

Save the page, right click on the page name in Pages and reattach it to the page layout. check in and that's pretty much it.
now Add images to your image library and watch them rotate ... mesmerizing....
you can add more options to nivo slider add fancy transitions and tooltips (check documentation on their site) obviously you can do a lot more with Data View display but this is just simple and quick way to make a banner rotator.

Let me know if there are any issues with this or something is not clear/missing.

Replace default navigation indicators with image thumbnails


You will need to make 3 adjustments to your slider: add css classes for the images and css class to the slider, modify options for your script and edit xsl template to include rel attribute containing path to the thumbnail

  1. Add the following css to your default.css style sheet

    .theme-default.controlnav-thumbs .nivoSlider {
        margin-bottom:100px; /* Tweak this to push content down */
    }
    .theme-default.controlnav-thumbs .nivo-controlNav {
        position:absolute;
        left:0px;
        bottom:-80px; /* Tweak this to push thumbnails down */
        margin:0;
    }
    .theme-default.controlnav-thumbs .nivo-controlNav a {
        display:inline;
        background:none;
        text-indent:0px;
        border:0;
        margin-right:10px;
        float:none;
    }
    .theme-default.controlnav-thumbs .nivo-controlNav a.active img {
        -webkit-box-shadow: 0px 1px 5px 0px #4a4a4a;
        -moz-box-shadow: 0px 1px 5px 0px #4a4a4a;
        box-shadow: 0px 1px 5px 0px #4a4a4a;
    }
    .theme-default.controlnav-thumbs .nivo-controlNav img {
        display:inline;
        position:relative;
        margin-right:10px;
    }
  2. add Use thumbnails Control Nav and Use image rel for thumbs options to your script (last two options)

    <script type="text/javascript">
        $(window).load(function() {
            $('#slider').nivoSlider({
            effect: 'slideInLeft',
            animSpeed: 500,
            pauseTime: 5000,
            pauseOnHover: true,
            controlNavThumbs:true,
         controlNavThumbsFromRel:true
            });
        });
        </script>
    
  3. Add rel attribute to the banner image

    There are two options to pull in thumbnails for the slider:
    • Set up separate Picture library in the same subsite just for thumbnails, upload thumbs into this library, add extra column (Picture) to your Banner Picture library, add thumbs to your newly created column and add the field to the rel="{@ThumbnailImageRef}" in your xsl template.
    • Use Thumbnails auto-created by Sharepoint 

      I like the second option because SharePoint created everything I need:
      if your banner image in HomePageBannerImages library is ForeverGreen.jpg with /HomePageBannerImages/ForeverGreen.jpg path,  the path to thumbnail for this image will be /HomePageBannerImages/_t/ForeverGreen_jpg.jpg and it is pretty easy to construct xsl string to render the path, XPath Expression Builder helps a lot  - final result:

      rel="{concat(@FileDirRef,'/_t/', substring-before(@FileLeafRef,'.'),'_',substring-after(@FileLeafRef,'.'),'.',@FileType)}"
      now add the above to your image tag after alt="{@FileRef}"
      remove<div id="slideshow_btns"></div> this is no longer needed add controlnav-thumbs class to the slider-wrapper div
      your final xsl


      <xsl:stylesheet xmlns:xsl="http://www.w3.org/1999/XSL/Transform" version="1.0"
          xmlns:ddwrt2="urn:frontpage:internal"
          xmlns:ddwrt="http://schemas.microsoft.com/WebParts/v2/DataView/runtime"
          exclude-result-prefixes="ddwrt2 ddwrt">
          <xsl:output method="html" indent="no"/>
       <xsl:param name="Today">CurrentDate</xsl:param>
          <xsl:template match="/">
              <div class="slider-wrapper theme-default controlnav-thumbs">
         <div class="ribbon"></div>
                  <div id="slider" class="nivoSlider">
          <xsl:apply-templates select="*"/>
         </div>
         
        </div>
              
          </xsl:template>
          
          <xsl:template match="Row">
              
                  <a href="{@LinkURL}" target="{@TargetWindow}"><img border="0" src="{@FileRef}" alt="{@FileRef}" rel="{concat(@FileDirRef,'/_t/', substring-before(@FileLeafRef,'.'),'_',substring-after(@FileLeafRef,'.'),'.',@FileType)}"/></a>
      
          </xsl:template>
      </xsl:stylesheet>